Well I decided to make use of that leftover pulled pork and was immediately impressed by the first chili recipe Google found for me. There wasn't quite as much meat left as I had originally thought so I followed her guide and bought a small piece of pork tenderloin, seared it with some salt and pepper and threw that in the pot too. I broke up the bbq pork in to shreds, and discarded most of the fatty bits.
BBQ pulled pork shreds
The main ingredients and spices I used are pretty standard for chili including: onions, red/green pepper, mushrooms, black/kidney beans and chili powder. But it's obviously the specialty items that really made this shine. The stars of the show included honey and the rest of the morning's coffee:
This leftover coffee is not just going down the drain
Her recipe called for bourbon. I didn't have any of that, but I figured this scotch was no slouch.
The richest and smokiest scotch around
I fried up the veggies, put it all together and let it simmer and reduce for a couple of hours.
The spicy masterpiece simmering away
So my final ingredient list was something like this:
2 lbs bbq pulled pork
1 lb boneless pork loin
salt and pepper
2 small onions, chopped
2 red bell peppers, seeded and chopped
2 Tbsp brown sugar
2 Tbsp chili powder
2 Tbsp cumin seeds
28 ounces canned diced tomatoes
4 Tbsp honey
1 cup black coffee
3/4 cup smoky scotch
1 can black beans, rinsed and drained
1 can kidney beans, rinsed and drained
With the wife gone to the great white north of Labrador for the next month, I had to enjoy the first bowl by myself.
The first magic bowl
So much flavour. The scotch and the bbq pork each contribute a special smokiness, while the coffee and honey add a lot of richness and depth. I think that instead of eating it for lunch every day this week like I usually do with big meals like this, I'm going to save it in the freezer and bring it out for a special occasion...
In honour of the Super Bowl and related gluttony, we decided to cook up something appropriate the day before. For the biggest pigskin game of the year, I figured pig made sense, so I picked up a 4kg bone-in pork shoulder butt from Sobey's to make BBQ pulled pork sandwiches.
Now when I'm taking about BBQ, I'm taking about the real deal using charcoal and smoking it low and slow. It's a full day affair, but the results are certainly worth the efforts.
To start the day, I liberally applied a spice rub, namely Weber's Type-A, which I found in my copy of Weber's Big Book of Grilling. That book is a fantastic collection of rubs, sauces, meat, sides, techniques and bbq folklore and a great source of inspiration, particularly the forward written by Al Roker. That man knows his BBQ and has the physique to prove it.
Applying the rub.
The rub ingredients are dry/powdered: mustard, onion, paprika, garlic, coriander, cumin and of course S 'n P.
The ying and yang of cooking.
While I let the rub set (for about an hour), I went outside to shovel off the deck and get the BBQ started. Oh the joys of BBQing in Winter. Again, the results were worth the efforts.
Making room for the BBQ.
Now I normally have a lot of trouble getting the charcoal lit and up to a decent heat. Takes a lot of lighter fluid, newsprint, matches and cursing. So I decided to get a chimney starter. The idea is that you fill it with charcoal, crumple up newsprint to stuff the bottom, light the paper and sit back and watch, relax and have a homebrew. Then once the tops coals are red, spread them out. No problem.
Using a chimney starter to get the charcoal going
Unfortunately, I didn't save myself any lighter fluid or cursing because even with the chimney starter, it still took me a while to get the meat on (almost 2hrs), but that was my fault for buying charcoal in bulk and leaving it to freeze and crumble in the garage... there's always a donkey twist to my projects... But once I got the meat on, the rest of the day went pretty smooth.
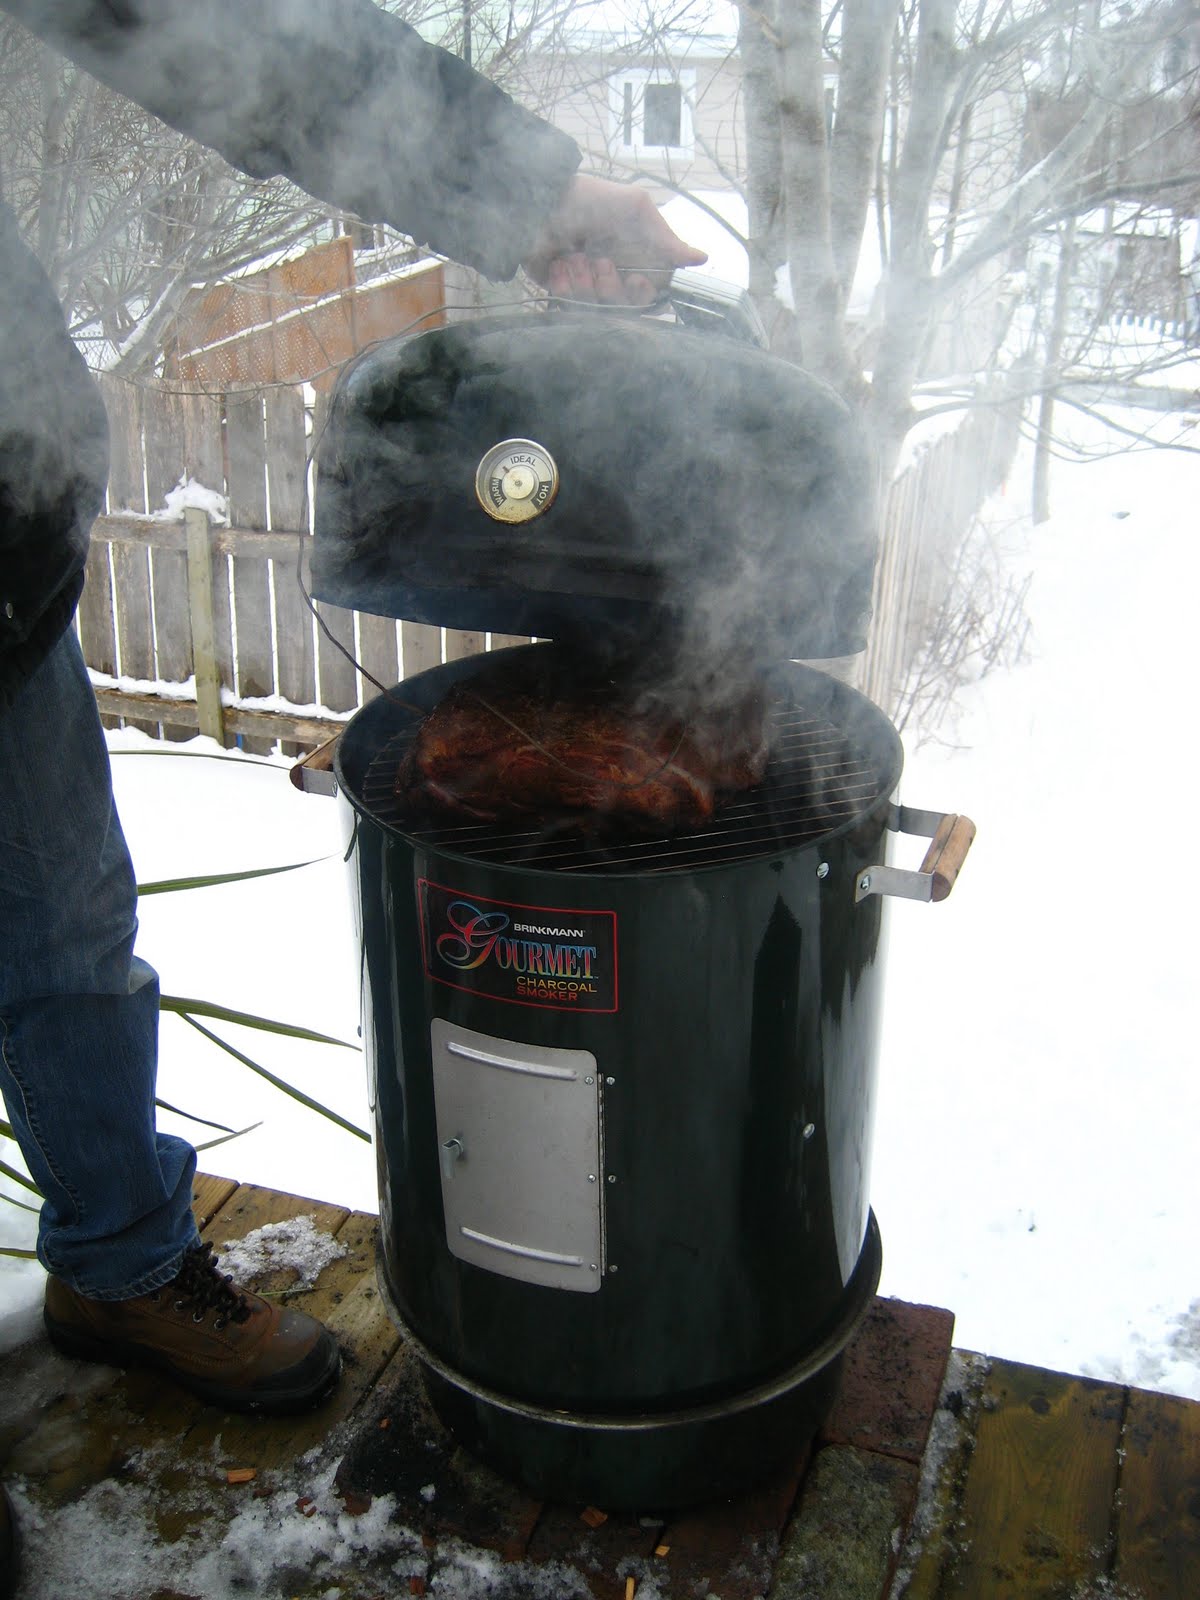
Ready to go! Low and slow!
My BBQ manufacturer makes it easy to know if your heat is sufficient. Just make sure the needle is on IDEAL and everything will be A-OK.
Ideal = ~275F
Of course, I like to have a little more knowledge and control over what's going on with my BBQ so I added a couple of digital thermometers to the mix. One to monitor the internal temperature of the meat, and the other for the cooking temp. I tried to keep it around 275F for the 6-7hrs of cooking time.
The smoker with dual-digital thermometers.
Every hour, I added soaked wood chips (hickory and pecan) and 8-10 charcoal briquettes to keep the heat up. This handy hatch makes that job pretty simple.
Adding wood chips.
The sight and smell of a big old piece of meat smoking on the grill is a wonder to behold...
To top up the sandwiches, I made a coca-cola bbq sauce and a mop sauce made from cider vinegar, a beer and some of the spice rub. On a related note, the secret recipe for coke is out now so I will not be able to resist making that sometime soon!
Coke BBQ sauce and beer vinegar mop sauce
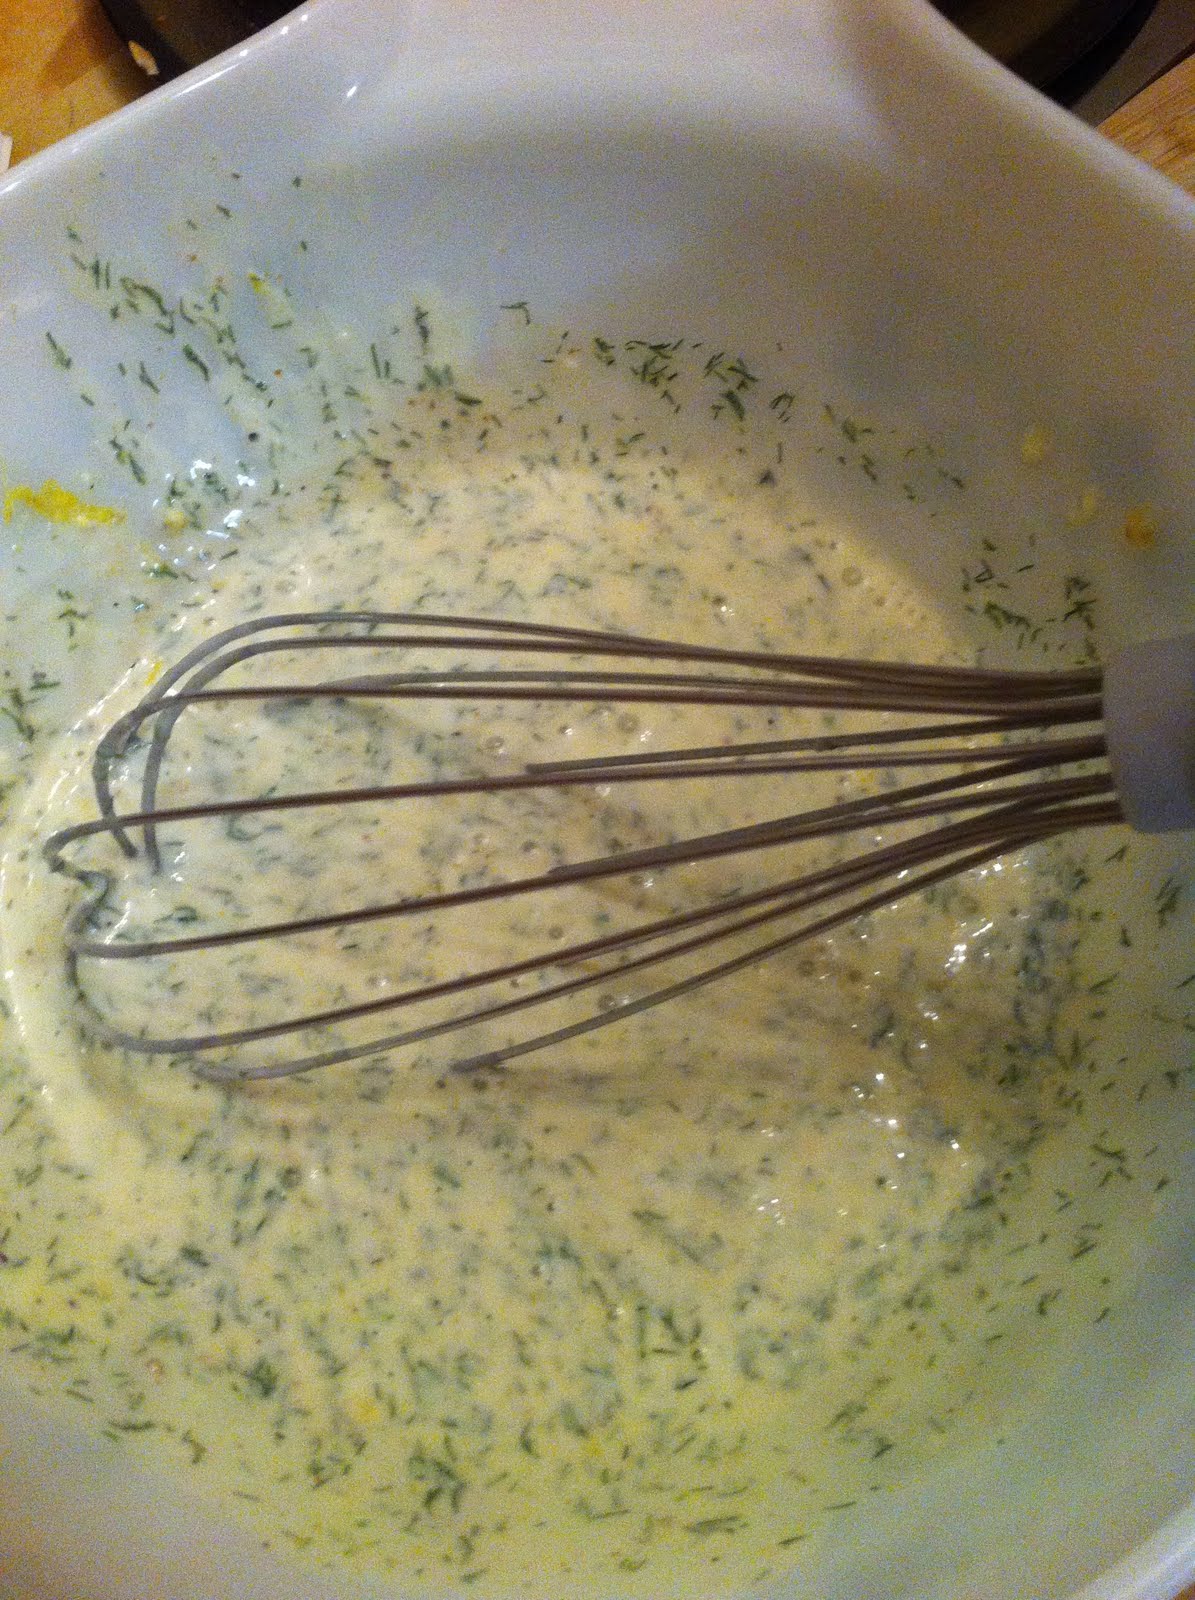
We had some buttermilk that my wife also needed to make whoopie, so I whipped up a buttermilk dill coleslaw dressing, also found in the Weber book.
Buttermilk dill coleslaw dressing
So it took about 7hrs for the meat to reach an internal temperature of 190F. Then I wrapped it in foil and let it rest while we got the rest of the meal ready. The meat pulled apart almost effortlessly into smokey, succulent morsels.
Some of the outside pieces with nice pink smoke rings.
I decided to serve the meat on slider buns because then we could have more sandwiches!!
Double pork sliders served with buttermilk slaw.
Fortunately, there were lots of leftovers to enjoy while we watched the game the next night. Unfortunately, the Steelers lost. I actually still have a big tub of frozen meat left that I'm going to use to make chili soon.
I was in the mood for something sweet this afternoon. We had some cocoa and icing sugar left over from another baking adventure and I remembered my mother used to make easy microwave fudge with those ingredients, so I gave it a shot.
I found this set of recipes and modified the last one since it was the most basic. Here is how I did it.
2 cups icing sugar
1/4 cup cocoa
1 tablespoon milk
1/4 cup butter
1 1/2 teaspoons vanilla
1. Combine icing sugar, cocoa, milk, and butter.
Mashing in the butter with the icing sugar, milk and cocoa.
2. Microwave on high power until butter is melted, about 2 to 3 minutes.
3. Stir until smooth. Blend in vanilla (and some nuts if you have them).
4. Spread into a buttered pan.
The chocolate mixture, ready to set
5. Refrigerate for 2 hours (or until cool) and cut into squares.
Mmmmmmmmm fudge!
6. Eat and enjoy!
It should keep in the fridge for about a week... Unless of course you eat it all before your wife gets home from vacation. :)
In case you didn't know, I love homebrewing and have been making my own beer in St. John's for about a year and half now. When I was in Halifax, I helped those other donkeys make a few batches of wine and beer and once we moved into our (rented) house here, I couldn't wait to get my own equipment and start brewing.
Up until the other day, I had been brewing exclusively with malt extract but adding my own hops. For example, here are some pics of a Pilsner brew from a few weeks ago. That recipe used Cooper's Lager (hopped malt extract), honey, Saaz and Hallertauer hops, and Wyeast Budvar Lager yeast.
Filtering the boiled hops out of a recent Pilsner brew.
I am pretty happy with the way the latest beers have turned out, but wanted to move on to the next level. That meant finding a recipe and taking the malted grains and extracting the fermentable sugars myself.
Over the Christmas break, we discovered a delicious wheat beer called Konig Ludwig Weissbier, which was part of a donkey beer tasting night in Halifax.
Beer tasting contestants. Early Jan 2011.
Like Hoegaarden or Rickard's White, it's a wheat beer but doesn't have any added spices like those Belgian styles. It tastes like bananas, cloves and vanilla and most of the flavour comes from the yeast used. It also leaves a bit of sediment in the glass, which might not be for everybody. So I think technically, it's a Hefeweiss (aka Hefeweizen), which is an unfiltered Weissbier, which is a German-style wheat beer.
Anyway, we loved it so I really wanted to make a wheat beer and hopefully chose a recipe that I could use as a basis for future brews.
I purchased my ingredients and got some really helpful advice from my local homebrew store, Brewery Lane.
I used a regular infusion mash, where you mix the grain and water together and hold it at a fixed temperature for about an hour, then sparge (rinse the sugar out). I used my cooler as a mash tun and converted it to lauter tun by adding a filter and valve, following the plans on the homebrewtalk.com wiki here.
Filter using stainless-steel braid.
Replaced drain-plug with a valve and hose.
There are other types of mashing such as two-stage infusion, or double/triple decoction but those are more complicated, and when getting started and using what are called "highly-modified" grains, single infusion is fine.
The mash went alright but I did have some issues with hitting my target temperature of 152F. When you add room temp grain to water at a ratio of 1 LB to 1 Quart, there should be an 18F drop. I had heated up my water to 170F using 2 pots but I think that made it cool down faster so when everything was mixed together, my temp was 147F. I had a homebrew, didn't panic too much and read that was fine, but that the conversion would just take longer and the beer might not have as much body (I can live with that).
Next time I would heat to 175-180F. Would be good to add a faucet on to the pot, like I did to the cooler, to keep the water flowing while I add the grain.
Adding the grain to hot water for the mash.
After an hour, when I opened the cooler, it certainly smelled like a real brewery inside. I extracted the sugary wort by slowly pouring more hot water over the top (which unfortunately cooled a lot again) and draining at the "same" rate from the other end. The spent grain wasn't sweet at all so I think the conversion worked!
Spent grain after mash.
I was targeting a final volume of 6 gallons so I collected 7 to account for boil off but after the boil I was actually only left with 5 gallons. I didn't add more water because my specific gravity was 1.050 already and I didn't want to dilute it more.
Boiling 7 gallons on the stove isn't ideal.
Chilling the hot wort in a bucket of snow.
Ready to ferment in bucket with airlock.
I learned a lot from this and can't wait for the next brew day. Really there's only so much reading you can do before you have to actually just brew it and get a better understanding of the process.
My buddy Jeff was a big help. He left a bit before the boil was done because he had to go home for supper. I failed to tell him it would take all of the afternoon and part of the evening to brew.
There are some more pictures up here. I would have taken more of the later stages but I was too tired to think and had a big clean-up ahead of me. Just like my homebrew hero Charles Papazian, I had used almost every pot, strainer and utensil in our kitchen!
The next evening, I made a short video describing the fermentation progress so far (will turn my phone sideways next time!):
I plan on leaving the brew in the bucket for 3 weeks, in order to complete the fermentation and settle a little. Then I'll prime and bottle and it should be carbonated and ready to drink 2 weeks later. Mit hefe!